插件安装 vue-tsc == > pnpm lint:fix
安装: npm i vue-tsc -D
安装: npm install --save prettier -D
用法:vue-tsc --noEmit && vite build
Vue 3 命令行类型检查工具基于 IDE 插件 Volar。
package.json 中添加
  "scripts": {
    "dev": "vite",
    "build": "run-p type-check \"build-only {@}\" --",
    "preview": "vite preview",
    "build-only": "vite build",
    "type-check": "vue-tsc --build --force",
    "lint": "eslint . --ext .vue,.js,.jsx,.cjs,.mjs,.ts,.tsx,.cts,.mts --fix --ignore-path .gitignore",
    "format": "prettier --write src/",
+    "lint:fix": "vue-tsc --noEmit && prettier --write .",
+    "gitcz": "git cz"
  },
插件安装 == > pnpm gitcz
只需要简单的三个步骤:
全局安装 commitizen,如此一来可以快速使用 cz 或 git cz 命令进行启动。
npm install -g commitizen
步骤 1: 下载依赖
npm install -D cz-git
步骤 2: 修改 package.json 添加 config 指定使用的适配器
{
  "scripts": {

  },
 "config": {
    "commitizen": {
      "path": "n
      ode_modules/cz-git",
      "czConfig": "./commitlint.config.cjs"
    }
  },
}
步骤3:创建 commitlint.config.cjs 文件
// .commitlintrc.js
/** @type {import('cz-git').UserConfig} */
module.exports = {
  rules: {
    // @see: https://commitlint.js.org/#/reference-rules
  },
  prompt: {
    alias: { fd: "docs: fix typos" },
    messages: {
      type: "选择你要提交的类型 :",
      scope: "选择一个提交范围(可选):",
      customScope: "请输入自定义的提交范围 :",
      subject: "填写简短精炼的变更描述 :\n",
      body: '填写更加详细的变更描述(可选)。使用 "|" 换行 :\n',
      breaking: '列举非兼容性重大的变更(可选)。使用 "|" 换行 :\n',
      footerPrefixesSelect: "选择关联issue前缀(可选):",
      customFooterPrefix: "输入自定义issue前缀 :",
      footer: "列举关联issue (可选) 例如: #31, #I3244 :\n",
      generatingByAI: "正在通过 AI 生成你的提交简短描述...",
      generatedSelectByAI: "选择一个 AI 生成的简短描述:",
      confirmCommit: "是否提交或修改commit ?",
    },
    types: [
      { value: "特性", name: "特性:     新增功能" },
      { value: "修复", name: "修复:     修复Bug" },
      { value: "冲突", name: "冲突:     代码合并,冲突处理" },
      {
        value: "格式",
        name: "格式:     代码格式(不影响功能,例如空格、分号等格式修正)",
      },
      {
        value: "重构",
        name: "重构:     代码重构(不包括 bug 修复、功能新增)",
      },
      { value: "性能", name: "性能:     性能优化" },
      { value: "测试", name: "测试:     添加疏漏测试或已有测试改动" },
      {
        value: "构建",
        name: "构建:     构建流程、外部依赖变更(如升级 npm 包、修改 webpack 配置等)",
      },
      { value: "集成", name: "集成:     修改 CI 配置、脚本" },
      { value: "回退", name: "回退:     回滚 commit" },
      {
        value: "其他",
        name: "其他:     对构建过程或辅助工具和库的更改(不影响源文件、测试用例)",
      },
    ],
    useEmoji: false,
    emojiAlign: "center",
    useAI: false,
    aiNumber: 1,
    themeColorCode: "",
    scopes: [],
    allowCustomScopes: true,
    allowEmptyScopes: true,
    customScopesAlign: "bottom",
    customScopesAlias: "以上都不是?我要自定义",
    emptyScopesAlias: "跳过",
    upperCaseSubject: false,
    markBreakingChangeMode: false,
    allowBreakingChanges: ["feat", "fix"],
    breaklineNumber: 100,
    breaklineChar: "|",
    skipQuestions: [],
    issuePrefixes: [
      // 如果使用 gitee 作为开发管理
      { value: "link", name: "link:     链接 ISSUES 进行中" },
      { value: "closed", name: "closed:   标记 ISSUES 已完成" },
    ],
    customIssuePrefixAlign: "top",
    emptyIssuePrefixAlias: "跳过",
    customIssuePrefixAlias: "自定义前缀",
    allowCustomIssuePrefix: true,
    allowEmptyIssuePrefix: true,
    confirmColorize: true,
    maxHeaderLength: Infinity,
    maxSubjectLength: Infinity,
    minSubjectLength: 0,
    scopeOverrides: undefined,
    defaultBody: "",
    defaultIssues: "",
    defaultScope: "",
    defaultSubject: "",
  },
};
袁果锅生态
用于 git cz 提交规范
- 安装依赖
npm install cz-customizable
npm install @shixinde/guoguo-cz
- 配置
在 package.json 中添加 config.commitizen 配置
  "scripts": {
     "gitcz": "git-cz"
    },
  "config": {
    "commitizen": {
      "path": "node_modules/cz-customizable"
    },
    "cz-customizable": {
      "config": "node_modules/@shixinde/guoguo-cz/commitlint.config.cjs"
    }
  }
扩展: 格式化工具
安装
  npm install -D prettier pretty-quick


执行
  "scripts": {
    "lint": "pretty-quick --staged",
  },

使用
  npm run lint | pnpm lint
插件安装 == > pnpm gitcz
安装 :npm install -g commitizen
安装: commitizen init cz-conventional-changelog --save --save-exact
安装: npm install @fe6/norm-git-cz-config
新增加一个文件
commitlint.config.cjs并添加内容
/** @format */

module.exports = {
  extends: ["@fe6/norm-git-cz-config"],
};
package.json 中添加
  "config": {
    "commitizen": {
      "path": "node_modules/cz-customizable"
    },
    "cz-customizable": {
      "config": "node_modules/@fe6/norm-git-cz-config/customizable.js"
    }
  }
在本地新建一个分支: git branch newBranch
切换到你的新分支: git checkout newBranch
创建并切换到新分支: git checkout -b newBranch
将新分支发布在github上: git push origin newBranch
在本地删除一个分支: git branch -d newBranch
在github远程端删除一个分支: git push origin :newBranch (分支名前的冒号代表删除)
原文链接:https://blog.csdn.net/qq_25623355/article/details/99292715
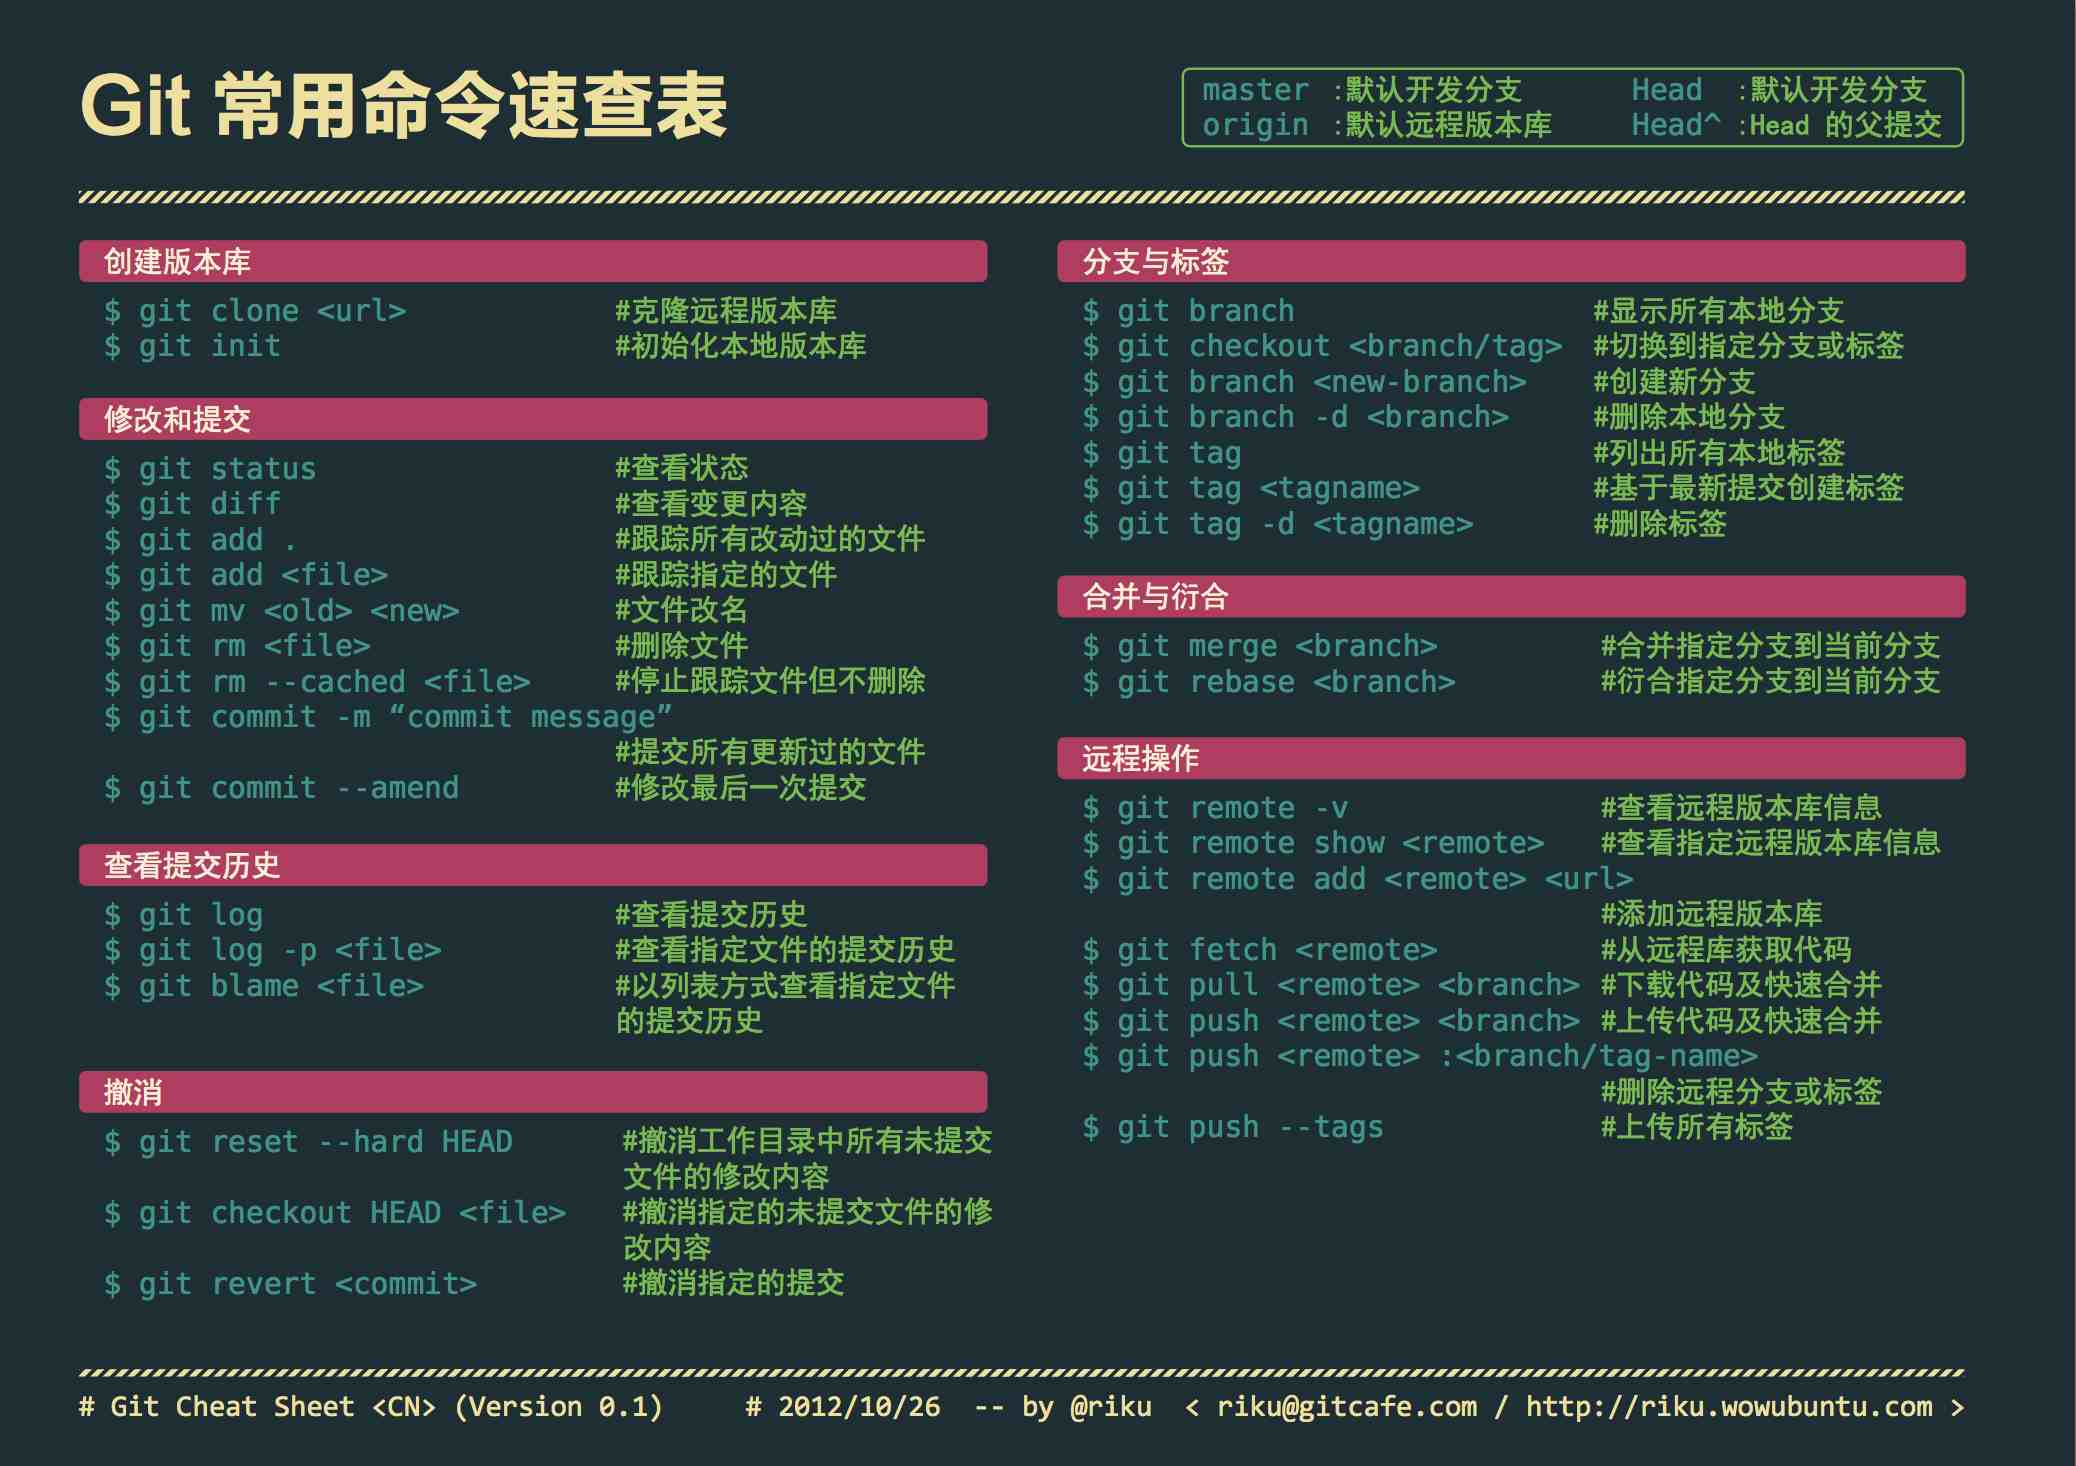
git init # 初始化本地git仓库(创建新仓库)
git config --global user.name "xxx" # 配置用户名
git config --global user.email "xxx@xxx.com" # 配置邮件
git config --global color.ui true # git status等命令自动着色
git config --global color.status auto
git config --global color.diff auto
git config --global color.branch auto
git config --global color.interactive auto
git config --global --unset http.proxy # remove proxy configuration on git
git clone git+ssh://git@192.168.53.168/VT.git # clone远程仓库
git status # 查看当前版本状态(是否修改)
git add xyz # 添加xyz文件至index
git add . # 增加当前子目录下所有更改过的文件至index
git commit -m 'xxx' # 提交
git commit --amend -m 'xxx' # 合并上一次提交(用于反复修改)
git commit -am 'xxx' # 将add和commit合为一步
git rm xxx # 删除index中的文件
git rm -r * # 递归删除
git log # 显示提交日志
git log -1 # 显示1行日志 -n为n行
git log -5
git log --stat # 显示提交日志及相关变动文件
git log -p -m
git show dfb02e6e4f2f7b573337763e5c0013802e392818 # 显示某个提交的详细内容
git show dfb02 # 可只用commitid的前几位
git show HEAD # 显示HEAD提交日志
git show HEAD^ # 显示HEAD的父(上一个版本)的提交日志 ^^为上两个版本 ^5为上5个版本
git tag # 显示已存在的tag
git tag -a v2.0 -m 'xxx' # 增加v2.0的tag
git show v2.0 # 显示v2.0的日志及详细内容
git log v2.0 # 显示v2.0的日志
git diff # 显示所有未添加至index的变更
git diff --cached # 显示所有已添加index但还未commit的变更
git diff HEAD^ # 比较与上一个版本的差异
git diff HEAD -- ./lib # 比较与HEAD版本lib目录的差异
git diff origin/master..master # 比较远程分支master上有本地分支master上没有的
git diff origin/master..master --stat # 只显示差异的文件,不显示具体内容
git remote add origin git+ssh://git@192.168.53.168/VT.git # 增加远程定义(用于push/pull/fetch)
git branch # 显示本地分支
git branch --contains 50089 # 显示包含提交50089的分支
git branch -a # 显示所有分支
git branch -r # 显示所有原创分支
git branch --merged # 显示所有已合并到当前分支的分支
git branch --no-merged # 显示所有未合并到当前分支的分支
git branch -m master master_copy # 本地分支改名
git checkout -b master_copy # 从当前分支创建新分支master_copy并检出
git checkout -b master master_copy # 上面的完整版
git checkout features/performance # 检出已存在的features/performance分支
git checkout --track hotfixes/BJVEP933 # 检出远程分支hotfixes/BJVEP933并创建本地跟踪分支
git checkout v2.0 # 检出版本v2.0
git checkout -b devel origin/develop # 从远程分支develop创建新本地分支devel并检出
git checkout -- README # 检出head版本的README文件(可用于修改错误回退)
git merge origin/master # 合并远程master分支至当前分支
git cherry-pick ff44785404a8e # 合并提交ff44785404a8e的修改
git push origin master # 将当前分支push到远程master分支
git push origin :hotfixes/BJVEP933 # 删除远程仓库的hotfixes/BJVEP933分支
git push --tags # 把所有tag推送到远程仓库
git fetch # 获取所有远程分支(不更新本地分支,另需merge)
git fetch --prune # 获取所有原创分支并清除服务器上已删掉的分支
git pull origin master # 获取远程分支master并merge到当前分支
git mv README README2 # 重命名文件README为README2
git reset --hard HEAD # 将当前版本重置为HEAD(通常用于merge失败回退)
git rebase
git branch -d hotfixes/BJVEP933 # 删除分支hotfixes/BJVEP933(本分支修改已合并到其他分支)
git branch -D hotfixes/BJVEP933 # 强制删除分支hotfixes/BJVEP933
git ls-files # 列出git index包含的文件
git show-branch # 图示当前分支历史
git show-branch --all # 图示所有分支历史
git whatchanged # 显示提交历史对应的文件修改
git revert dfb02e6e4f2f7b573337763e5c0013802e392818 # 撤销提交dfb02e6e4f2f7b573337763e5c0013802e392818
git ls-tree HEAD # 内部命令:显示某个git对象
git rev-parse v2.0 # 内部命令:显示某个ref对于的SHA1 HASH
git reflog # 显示所有提交,包括孤立节点
git show HEAD@{5}
git show master@{yesterday} # 显示master分支昨天的状态
git log --pretty=format:'%h %s' --graph # 图示提交日志
git show HEAD~3
git show -s --pretty=raw 2be7fcb476
git stash # 暂存当前修改,将所有至为HEAD状态
git stash list # 查看所有暂存
git stash show -p stash@{0} # 参考第一次暂存
git stash apply stash@{0} # 应用第一次暂存
git grep "delete from" # 文件中搜索文本“delete from”
git grep -e '#define' --and -e SORT_DIRENT
git gc
git fsck
推送 dist 文件夹到子分支 gh-pages
第一步

/dist 目录需要被 git 记录,于是后面我们才可以用它作为子树(subtree),因此 /dist 不能被 .gitignore 规则排除

第二步

git subtree push --prefix dist origin gh-pages

搞定。其中:

dist 代表子树所在的目录名
origin 是 remote name
gh-pages 是目标分支名称
当本地登陆了一个账号,但是要拉取另一个账号的git地址
git 使用采坑 - The project you were looking for could not be found 解决方式
问题描述:使用 git clone 项目,出现这个问题:The project you were looking for could not be found.
原因:gi t 自动保存 git 密码的功能(自己在单位电脑用了码云和 github 做了仓库,估计起了冲突)
解决方案一:
git clone http://@git.coding.net/name/project.git ---- 失败
添加远程地址的时候带上用户名及密码即可解决,格式如下:
git clone http://yourname:password@git.coding.net/name/project.git ---- 成功
解决方案二:
在自己的项目路径上加上自己的用户名, 例如: Git clone http://git.coding.net/name/project.git ---- 失败 Git clone http://git 账户名 @git.coding.net/name/project.git 然后再弹出的密码输入指令后面输入密码 ---- 成功
解决方案三:
清除本地 git 账户,重新输入用户名密码(最优)
git config --system --unset credential.helper 之后再进行 git 操作时,弹出用户名密码窗口,输入即可
有问题,请留言!
Git 新建源
# 查看方式:
git remote -v

# 修改方式:
git地址url指定远程仓库:(常用)
git remote set-url origin git@new.server.com:username/repo.git

或者https方式:
git remote set-url origin https://new.server.com/path/to/repo.git

或者是本地的其他仓库当做remote时候:
git remote set-url origin file:///path/to/repo.git

或者甚至是亚节点:
git remote set-url origin path/to/repo.git
指定上游分支 git branch -u origin/master
git branch -u origin/master 的作用是将当前分支的上游分支设置为远程仓库 origin 中的 master 分支6。
- 参数解析:
-u:是--set-upstream的缩写,用于指定上游分支。origin:是远程仓库的默认名称。当你克隆一个仓库时,Git 会自动将远程仓库命名为origin3。master:是远程仓库origin中的主分支名称,这里指定了要将当前分支与远程origin仓库的master分支建立关联3。
- 设置后的效果:设置好上游分支后,执行
git pull和git push等命令时,Git 会自动识别当前分支对应的远程分支,简化了操作。例如,后续你在当前分支执行git pull时,如果没有指定其他参数,Git 会默认从origin/master拉取代码;执行git push时,也会默认将当前分支的更改推送到origin/master。这样可以避免每次都手动指定远程仓库和分支名称,提高操作效率。
需要注意的是,origin/master 是一个整体的参数,表示远程仓库 origin 的 master 分支,而不是先指定 origin 为远程仓库,再指定 master 为分支。如果要设置其他本地分支的上游分支为 origin/master,则需要在 git branch -u origin/master 后加上本地分支名称。例如,git branch -u origin/master mybranch,表示将本地的 mybranch 分支的上游分支设置为 origin/master。
git branch --set-upstream-to=origin/master master
it branch -u origin/master 的作用是将当前分支的上游分支设置为远程仓库 origin 中的 master 分支6。
- 参数解析:
-u:是--set-upstream的缩写,用于指定上游分支。origin:是远程仓库的默认名称。当你克隆一个仓库时,Git 会自动将远程仓库命名为origin3。master:是远程仓库origin中的主分支名称,这里指定了要将当前分支与远程origin仓库的master分支建立关联3。
- 设置后的效果:设置好上游分支后,执行
git pull和git push等命令时,Git 会自动识别当前分支对应的远程分支,简化了操作。例如,后续你在当前分支执行git pull时,如果没有指定其他参数,Git 会默认从origin/master拉取代码;执行git push时,也会默认将当前分支的更改推送到origin/master。这样可以避免每次都手动指定远程仓库和分支名称,提高操作效率。
需要注意的是,origin/master 是一个整体的参数,表示远程仓库 origin 的 master 分支,而不是先指定 origin 为远程仓库,再指定 master 为分支。如果要设置其他本地分支的上游分支为 origin/master,则需要在 git branch -u origin/master 后加上本地分支名称。例如,git branch -u origin/master mybranch,表示将本地的 mybranch 分支的上游分支设置为 origin/master。
git push d2dmaster master:d2c-master
将本地master分支的代码 提交到 【d2dmaster】 这个源的 d2c-master 分支
在 Git 中,设置账户和邮箱是配置 Git 用户信息的重要步骤。这些信息会出现在你的提交记录中,帮助标识你的身份。以下是设置账户和邮箱的详细步骤:
- 全局设置 全局设置会影响你在本地计算机上所有仓库的提交信息。使用以下命令设置全局用户名和邮箱:
设置全局用户名
git config --global user.name "你的名字"
设置全局邮箱
git config --global user.email "你的邮箱地址"
git config --global user.name "John Doe"
git config --global user.email "john.doe@example.com"

git config --global user.name "袁果锅"
git config --global user.email "2914310412@qq.com"
- 本地设置 如果你只想在某个特定的仓库中使用不同的用户名和邮箱,可以在该仓库的目录下运行以下命令:
在仓库目录下设置本地用户名
git config user.name "你的名字"
在仓库目录下设置本地邮箱
git config user.email "你的邮箱地址" AI写代码 例如:
cd /path/to/your/repo
git config user.name "Jane Doe"
git config user.email "jane.doe@example.com"
本地设置会覆盖全局设置,仅对该仓库生效。
- 检查当前配置 你可以随时检查当前的 Git 配置信息,确认用户名和邮箱是否设置正确:
查看全局配置
git config --global --list
查看本地配置
git config --list
- 修改配置文件 Git 配置信息存储在配置文件中,你可以直接编辑这些文件来修改设置:
全局配置文件:位于 ~/.gitconfig(Linux/Mac)或 %USERPROFILE%.gitconfig(Windows)。
本地配置文件:位于仓库目录下的 .git/config 文件。
你可以使用文本编辑器打开这些文件,手动修改 user.name 和 user.email 的值。
- 注意事项 邮箱格式:确保邮箱地址格式正确,否则可能会导致提交失败或无法正确关联到你的 GitHub/GitLab 账户。
隐私保护:如果你不想在公开的仓库中显示真实邮箱,可以使用 GitHub 提供的隐私邮箱功能(如 username@users.noreply.github.com)。
多账户管理:如果你需要在同一个机器上管理多个账户(例如,个人项目和工作项目),建议使用本地设置来区分不同仓库的用户名和邮箱。
临时禁用凭据,可以重新切换账号
临时禁用凭据助手,只对当前仓库生效
git config --local credential.helper ""
清除 credential.helper=store 存储的凭据
rm ~/.git-credentials
清除 macOS 钥匙串中存储的 Git 凭据
git credential-osxkeychain erase
然后输入你的 Git 服务器地址
host=gitlab.51qqt.com protocol=https